What OpenClaw is, and why people are both hyped and wary
OpenClaw, the agent also called Clawdbot or Moltbot, is your always‑on AI assistant that runs as a daemon on a computer and does real work across your digital life. It hangs out in Telegram, it checks email, it proposes times, it books meetings, it files notes, and it runs commands. Under the hood it uses Anthropic's Claude API to make decisions and plan actions. In short, it feels like a junior EA that never gets tired.
It runs great on a Mac Mini or VPS, but I run it inside a virtual machine on my laptop, so it stays contained. That containment matters. The minute you connect email, calendar, or passwords, any misstep can cause real damage. Think bad replies, wrong invites, leaked tokens, or a rogue command. That is why this guide is security first, not shiny first.
You will see mixed names in posts and threads. OpenClaw used to be called Clawdbot, then Moltbot, and some guides still use those names. That is normal in fast projects. Functionally, we are talking about the same thing.
Safety first, your threat model and guardrails
Here is what can actually go wrong. Over‑permissioning lets the bot read or change way too much in email and Drive. Prompt injection can trick it into dumping secrets or running bad commands. Exposed gateways on the open internet get scanned, then poked. And default plaintext secrets on disk make any machine compromise way worse.
"Treat your agent like a new intern on day one. Sandbox it, whitelist what it can execute, and run a security audit before you give it the keys." - Practical rule I follow after a few hard lessons
Built‑in defenses exist, but you have to turn them on. The creator's guidance is clear: enable sandbox mode, add a command whitelist, read the security docs, and run the security audit before you go live. There is even a one‑liner audit to check your setup: run clawdbot security audit and fix what it flags.
If you want the canonical reference on hardening, the official security docs are excellent and worth a slow read: docs.molt.bot/gateway/security.
- Separate accounts. Create a fresh Google account for the bot. Never reuse your personal credentials.
- Least privilege. Start with read‑only calendar access and tight email rules.
- Keep endpoints private. If you must expose a gateway, put it behind auth and a firewall.
Step‑by‑step, my sandboxed Mac setup with no extra hardware
This exact setup runs on my Mac in a VM. It is boring, safe, and it works. If it goes weird, I nuke the VM and restore a snapshot. Done.
1) Build a disposable VM with UTM
- Create a macOS VM in UTM - UTM is free and runs a full macOS guest on your Mac. Give the VM enough RAM and disk. You want a clean, isolated OS with its own filesystem.
- Keep the bot inside the VM - Install everything in the VM. No shared folders to your host. If something breaks, delete the VM and start fresh.
2) Install OpenClaw in the VM
- Install Node.js - Use your preferred method inside the VM.
- Install the CLI - Run
npm install -g clawdbot. - Onboard - Run
clawdbot onboardto walk through API keys and QuickStart. This sets the core config and tools the bot needs. - Start the gateway - Run
clawdbot gateway startto launch it as a background daemon. Set it to auto‑start on reboot with a LaunchAgent so the bot comes back after restarts.
3) Harden prompt injection
- Turn on sandbox and whitelist - Limit which commands the bot can run. Start with a tiny list:
ls,catin a temp folder, maybecurlto known domains. Expand only when you need to. - Add an inoculation pack - I install ACIP, the Advanced Cognitive Inoculation Prompt, to make the bot more resistant to prompt injection. It is open source here: github.com/Dicklesworthstone/acip.
- Audit before go‑live - Run
clawdbot security audit. Fix red flags now, not after a weird email goes out.
4) Give the bot its own Google account
- Create a fresh account - This isolates email, calendar, and Drive. No access to your personal inbox. No mixed tokens.
- Share, don't sign in - From your main Google account, share the specific calendars the bot needs with the bot's account, read‑only to start. Accept invites inside the VM.
5) Set up email polling with guardrails
- Install a mail CLI - I use
goginside the VM so the bot can check its own inbox. Authenticate with the bot's Google account, not yours. - Give it rules - Add an
Email Accesssection in yourTOOLS.md. List trusted senders it can act on. For all others, read‑only. No replies without your approval. - Poll on a schedule - Set a cron job for every 2 minutes. That keeps response time snappy without hammering the API.
6) Store secrets in a 1Password service account
- Create a vault - In 1Password, create a vault named "Shared with OpenClaw" just for the bot.
- Create a service account - Give it access to that vault only. Copy the API key into the VM and keep it in a creds file.
- Use the CLI - Teach the bot to use
opfor all secrets. For example,op item createfor API keys andop item getto read them at runtime. Never write plain text secrets to disk.
7) Teach it to schedule like a real EA
- Write SCHEDULING.md - Spell out time zone, working hours, VIPs who can override busy blocks, buffers, preferred video platforms, and travel rules. Be specific. It follows whatever you write.
- Reference it in TOOLS.md - Tell the bot to consult SCHEDULING.md before proposing times or sending invites.
Where to run OpenClaw, VM vs cloud vs dedicated box
I tried all three. Here is the short version.
| Option | Cost | Safety | Convenience | Speed | Best for |
|---|---|---|---|---|---|
| VM on your Mac | Free software, uses your hardware | High, great isolation and snapshots | Good, but only on when your Mac is on | Good | Beginners and anyone cautious |
| Cloud VPS | Low monthly fee | Medium, needs firewall and zero‑trust | Great, always‑on | Great | 24/7 availability with careful hardening |
| Dedicated mini‑PC/Mac | Upfront hardware cost | High, physical isolation | Great, always‑on | Great | Power users who outgrow a VM |
✅ Pros of a VM on your Mac
- Strong isolation without buying new hardware
- Snapshots and quick rollbacks
- Easy to delete the whole environment if it misbehaves
❌ Cons of a VM on your Mac
- Goes offline when your laptop sleeps
- Resource sharing with your main OS
- Some friction with USB or host integrations
My recommendation for newbies is simple, start with a VM on your Mac. You get isolation, snapshots, and a small blast radius if you mess up. Move to a VPS or a dedicated box later if you need 24/7 uptime.
Post‑setup habits, updates, keys, and the mistakes I made
Getting it running is step one. Keeping it safe and useful is the job.
Weekly ops I actually do
- Update OpenClaw, tools, and skills inside the VM
- Run
clawdbot security auditafter updates - Rotate API keys that touch money or sensitive data
- Review logs for weird commands or unexpected senders
- Create a VM snapshot before big config changes
Mistakes I made so you do not
- Used my personal Gmail once. Regretted it instantly. The bot saw way too much and confused personal threads with work.
- Gave 1Password access to more than one vault. I got lazy. Scope it to a single vault named for the bot.
- Added the bot to a group chat too early. It tried to be helpful and almost sent a draft without my approval. Keep it in 1:1 until your rules are tight.
- Skipped a snapshot before a big change. Guess who spent an hour rebuilding a VM. Take the snapshot.
Scale smart when you are ready
- Memory. Add a memory plugin like Supermemory to reduce repeated context and make the bot smarter over time.
- Token trimming. Use a skill like QMD to shrink prompt size and save money.
- Local models. For experiments, wire up a local LLM via Ollama inside the VM. Great for fast drafts, while keeping Claude for high‑stakes tasks.
Troubleshooting and recovery when it misbehaves
You will have a weird moment. Here is how I contain the blast and move on.
- Roll back fast - Restore your last good VM snapshot. Do not try to fix a broken state while live.
- Check the audit trail - Look at logs to see what commands ran and which accounts it touched. If any token looks compromised, revoke it.
- Tighten the whitelist - Remove commands it does not need. Pause external web access if things look off.
- Reset skills or memory - If the bot drifts or gets confused, reset memory files and re‑seed your policy docs.
- Isolate first, fix second - If you feel uneasy, shut down the VM, change shared passwords, review scopes, then bring it back online.
- Snapshots are your safety net. Use them.
- Logs tell the story. Read them before guessing.
- When in doubt, shut it down, rotate keys, and start clean.
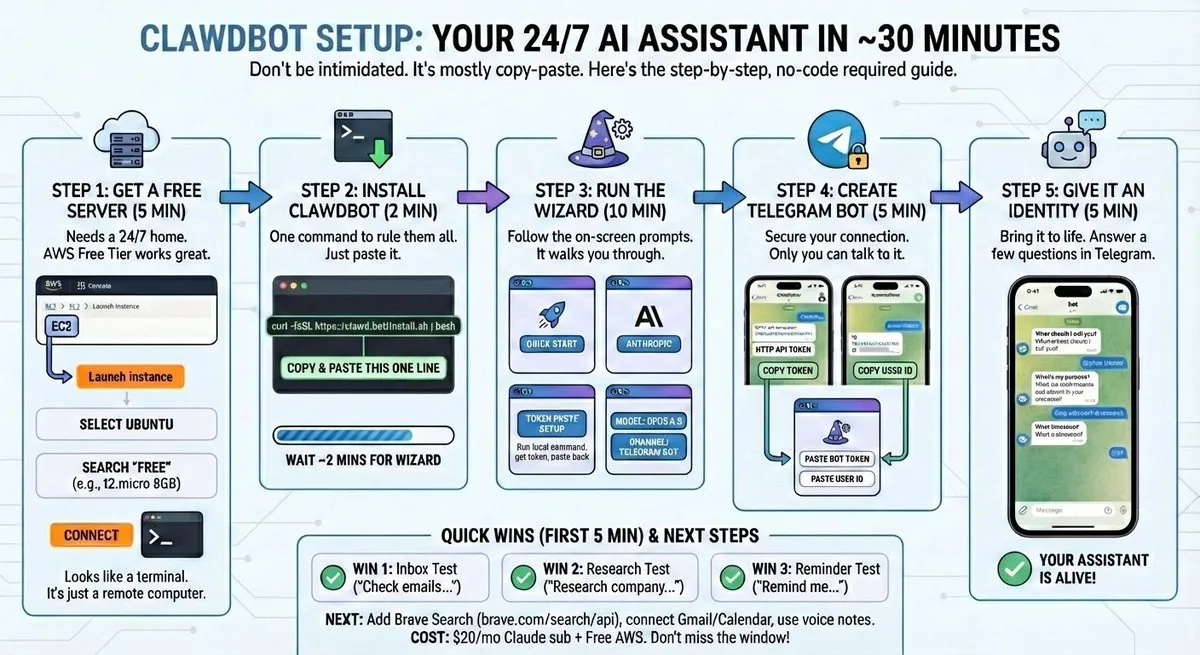
Quick install notes for beginners
If you skipped straight to the how, here is the concise install path inside the VM:
- Install Node.js inside the VM.
- Install OpenClaw CLI with
npm install -g clawdbot. - Run the wizard with
clawdbot onboardto set keys and enable QuickStart. - Start the gateway with
clawdbot gateway start. Add a LaunchAgent for auto‑start on reboot. - Harden with sandbox mode, a strict whitelist, and
clawdbot security audit. - Connect Telegram, the bot's Google account, read‑only calendars, and 1Password CLI.
Do these in this order and you avoid 90 percent of pain.